Forum Replies Created
-
AuthorPosts
-
Eric AlexanderParticipant
Thanks Chris. Good info.
Eric AlexanderParticipantKeith – the significant changes are clutch, airbox, and a tightening of cylinder head castings tolerences (some pre-2009 cylinder heads are now illegal for official RMC events). These are the basic things that will need to be changed/checked for RMC entry. The clutch and airbox are no-brainers; the older clutch had reliabilty issues and the new airbox makes removal (for jetting) much easier. The cylinder is something to check your casting number against the rules. Do a search on Rotax cylinder casting and you’ll find the casting numbers that are legal.
Changes Rotax makes to the engines over time are designed to not improve performance. Instead, the focus is on better performance consistancy between engines, improved reliability, and easier maintinance.
Other changes made are (optional*) hotter ignition module for more consistant high RPM performance, needle bearing and o-ring for clutch to prevent bearing grease from getting onto the clutch drum, improved battery options, and most recently, the reduction of carb venturi options from two to one (8.5).
* EDIT: Since this thread has been getting some traction recently, I wanted to clarify something I wrote to avoid confusion. When I say the hotter ignition module is “optional”, that means the newer 2009+ coil with the green tab is NOT a required upgrade. All newer engines have this coil, but it is not required to upgrade an older engine for RMC legality.
Eric AlexanderParticipantBob, most all jetting software has a means of calibrating the software a small percentage for your specific carb/engine combo. So in the beginning you need to experiment a wee bit and dial the software in. But then it becomes pretty much enter the weather data and go with few exceptions.
None of the software I’m aware of have the venturi as a spec. Most all do have float weight/idle jet & emulsion tube size/needle type/spark plug/and float arm height.
Eric AlexanderParticipantYeah, its good to know a simple loop through the clip works as well. ;-)
Eric AlexanderParticipantTroy, I wish it was that easy! That clip’s instructions say that you thread the wire through one hole, then wrap the wire around the plug wire three times. Finally, you thread the end back underneath the three wraps and through the second hole. That’s the clip I use, and to do it neatly and tight takes a few minutes. Those are the minutes (and pain in the keaster) I’m looking to save with the disconnect. Also, the disconnect will allow me to have a spare ignition module/plug wire pre-wired with the RPM clip data line.
Eric AlexanderParticipantThe CRG Kali 125 chassis around that year may have used 2000-up brakes as well. 2000-up has double calipers on a drilled rotor. Also the 2000-up on the 125 chassis’ utilized twin master cylinders with independent brake lines run to each caliper.
Take a picture and post it and I’m sure someone can positively ID.
August 2, 2013 at 7:02 am in reply to: Seat Position, Weight Distribution, and the lack of scales. #5806Eric AlexanderParticipant1. Most manufacturers will list the proper weight distribution for their chassis’. 40/60 to 43/57 is common. Thats a good starting point, then let the handling and stopwatch be the guide.
2. Go ahead and buy 4 bathroom scales. You really need to have all four wheels scaled simultainiously. Bathroom scales are a good starter set-up, but know they will not be 100% accurate. Calibration from scale to scale, and accuracy as weight is added tend to be “fuzzy”. With that in mind – go cheap with a bathroom scale. I’m talking $10-15 apiece cheap. If you’re spending more, go with a shipping scale (@ $50-ish apeice). Next step would be used racing scales at $400-700 a set. Finally new racing scales at $700-1500 a set.
So for a karter new to scales, a bathroom scale set will intro you to scaling, get you in the ballpark, and show any gross weight issues. Also get a nice 4′ level and a dozen 1’x1′ floor tiles to level the scales on your floor.
Don’t even begin to think the bathroom scale set-up is scientific. Its not. Thats why the racing scales cost so much – accuracy. Just assume each scale is accurate to within +/- 3lbs, and your total class weight is +/- 15lbs. In other words don’t think your total is making you class legal! Also, to check for consistancy, after you weight the kart, rotate the scales so each is under a different corner of the kart and double check the weights. Doing this a few times will reveal if you have a scale way off from the rest.
Good luck.
Eric AlexanderParticipantThanks Nick. Always appreciate your responses in the Rotax section.
Can you maybe describe what to listen for as the valve opens? The manual states there is an audible difference.
Eric AlexanderParticipantI think seat fit is largely a personal preference. But you don’t want to move around too much. My seat fits tight when on the grid. But under cornering forces I have enough room to slot my elbow between me and the seat padding (not that I do that mind you – LOL).
In general I try to relax. My grip on the wheel is very relaxed. And I don’t particularly brace myself for corners. That said, I do notice I maintain my knees close to the tank in the corners as opposed to some guys whom I’ve seem allow their knees to flop about.
Eric AlexanderParticipantI’m running a simple Mychron 3 so all I use is the RPM trace. Here’s an example:

All three laps are within a tenth of a second to one another. None are perfect – or really good for that matter. The red is the fastest. This section of the plot shows two corners and a chicane – a long sweeping right-hander followed by a right-left chicane, and a tight left (turns 4, 5, and 6 at GoPro Motorplex).
First corner: BLACK takes the corner best. YELLOW brakes too late and pushes on entry to the apex. RED get a little wheelspin and goes loose on exit.
Chicane: RED takes the chicane best – almost perfect with a slight lift but then back on the throttle. BLACK enters too fast and must back off. YELLOW isn’t carrying enough speed as a result of the previous corner’s mistake.
Last corner: RED looks good. A little lock-up (the RPM plateau’s), then braking continues. Smooth apex and good exit. BLACK pushes on entry and has to back off. YELLOW again brakes too late, pushes on entry, overcompensates and gets loose on exit.
Looking at all three together, you can begin to see how a better lap might benefit from aspects of both BLACK and RED combined.
Eric AlexanderParticipant“I will look at the smoothness of the RPM trace throughout the corners. However, I don’t know how this will help. I try to drive smooth every corner and every lap. Maybe looking at the data will clear that up??”
I’m a big fan of looking over data from my sessions. I like to overlay various laps against my best lap and see where time is lost and gained. Typically, time lost is due to pushing too much and having to over-correct. This typically means lifting the throttle and shows in the data as larger on/off spikes during cornering. My fastest laps typically have less of these corrections.
One can also see how much speed you’re carrying in the corners. Again, overlaying laps can help you analyse your cornering technique for consistancy. And when looking at straight-away speed, go back and look at the previous corner to analyze the apex and exit. Getting used to doing this can help you see where you’re inconsistant and what the potential ideal lap looks like.
I don’t spend alot of time on the data during a day’s sessions. But rather go over later when I’m able to sit and shift through it.
Eric AlexanderParticipantI think it should be mentioned that the key to understanding the kart is to be smooth. I find most new karters tend to overdrive the kart and that complicates them gaining a feel for what the kart is doing. Most things like understeer and oversteer can be brought about from overdriving the entry or exit of a corner. But as one’s technique smoothes out over time, the kart’s handling subtlties will become more apparent.
If one has a Mychron and the ability to download data into Race Studio, I think that information can be useful in helping a driver smoothly carry speed through corners. I find slower laps almost aways have a less smooth RPM trace throughout the corners.
As TJ referenced above, steering input is a great indicator. Watch some YouTube videos of known fast drivers and note just how little they turn the wheel. Anytime you turn the wheel more than nessecary, you are effectively binding the kart with friction in some way. So less is more in this regard. Once you’ve pefected this, the kart will start talking to you more clearly because what you’re experiencing is more of the kart and less of your corrections.
Another thing I believe is important is to analyze each corner by three distinct zones: (1) braking/turn-in, (2) apex, and (3) exit. As you gain a feel for the kart, you should use terms like loose, neutral, push, hop, etc., applied to each of the three zones. Ask youself questions like: “Is it pushing going into this corner because I’m braking too late?” or “Is the kart getting loose as I go over those bumps on the exit?” or “Is the kart hopping at the apex preventing me from maintaining speed?” This will help guide you in set-up and what to try.
Lastly, the easiest changes to a kart are front track and tire pressure, so I’d start there to learn to read the kart as you can make these adjustments quickly and get back out.
Eric AlexanderParticipantVIR Kart is essentially open for kart owners anytime. Patrick heads up the facility there and all you need to do is call him in advance and work out a day and time. Typically when I’ve truckd my karts there, we’re the only ones running. Occasionaly some rental karters will show up – in which case we allow them to run their 10 minutes and then continue on.
The layout is fairly simple, but there’s some nice elevation changes and the flow is enjoyable.
VIR kart is actually a good little track for a beginner, or someone just looking to turn some laps and get their kart working better. It a beautiful setting and, like I said, you can basically have the place to yourself. So its devoid of the pressure of traffic sometimes found at a place like Moorseville Motorplex in NC.
Eric AlexanderParticipantAfter some research, I’m going to try a bullet-style crimp connector. I believe this will be secure and supply a good dry connection at all times.
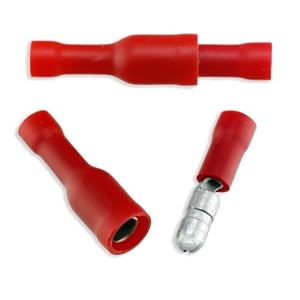
I’ll keep this thread posted on my progress.
Eric AlexanderParticipantGreat tip. I’ll check that out.
Eric AlexanderParticipantThanks Tony. On the list of things to do.
And here’s a screenshot showing the temp. Red is one engine and yellow is the other engine with the temp issue. Its also dangerously close to too hot – 186 degrees.
 Eric AlexanderParticipant
Brad, I thought I’d chime in here. IMO, the RM-1 is a very cool kart. It is very unique and and has many innovative features – making it both cool and hard to find parts for.
However, it is uncompetitive by modern DD2 standards. So IMO, that RM-1 should be in the hands of someone who might add it to their collection to showcase it for what it is – a unique slice of Rotax history. But to simply have one as your main kart, or to try to race it competitively, its a bad choice.
Eric AlexanderParticipantSodi made the RM-1s.
Eric AlexanderParticipantThe three elongated holes per bearing carrier are the way to adjust ride height. To run the ride height in its lowest position, the bolt should be higher in the elongated slots.
When I lower the ride height, I do it with the kart on the ground. Loosen all nine bolts and the axle will shift to the highest position (lowering the chassis ride height). When raising ride height, place the kart on a stand. Loosen all nine bolts and the axle will drop to the lowest position (raising the chassis ride height).
-
AuthorPosts










Archives